How to Upload a Config File to a Cisco Switch
Objective
The Backup Configuration File or log of the switch is useful for troubleshooting or if the device accidentally gets reset. This contains manual copies of files used for protection confronting system shutdown or for the maintenance of a specific operating state. For instance, y'all tin copy and save the Mirror Configuration, Startup Configuration, or Running Configuration to a Backup file. You lot can use this file to update or restore the switch back to its functional country.
The Fill-in Configuration File can be saved on the Internal Wink retentivity or a USB device fastened on your switch, a Trivial File Transfer Protocol (TFTP) server, a Secure Copy (SCP) server, or on your figurer. This article will guide you on how to download or dorsum up a arrangement configuration file through any of the following methods:
- Via TFTP — The Niggling File Transfer Protocol (TFTP) method is chosen to download or back up configuration file via TFTP. TFTP is mainly used to boot upward computers in LAN, and is also suitable to download files.
- Via HTTP/HTTPS — The Hyper Text Transfer Protocol (HTTP) or Hyper Text Transfer Protocol Secure (HTTPS) method is chosen to download or back up configuration file via HTTP/HTTPS. This method is more popular for file downloads equally information technology is more than secure.
- Via SCP (Over SSH) — The Secure Copy (SCP) (Over (SSH)) method is chosen to download or back up configuration file via Secure Shell (SSH). This download or back upward of configuration files are washed over a secure network.
- Via USB or Internal Flash — This method is chosen to download or dorsum up the source file into the internal flash memory or a connected USB bulldoze on the switch.
Applicative Devices
- Sx250 Series
- Sx350 Serial
- SG350X Series
- Sx550X Series
Software Version
- 2.3.0.130
Back Up Configuration Files
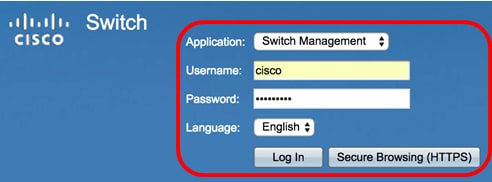
Step 1. Log in to the web-based utility of your switch. The default username and password is cisco/cisco.
Note: If you already have inverse the countersign or created a new account, enter your new credentials instead.
Pace ii. Choose Avant-garde from the Display Mode drop-down list.

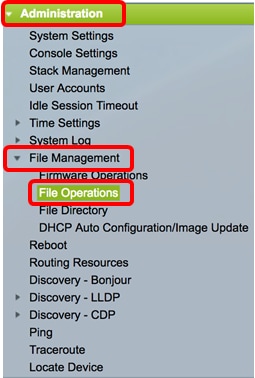
Step three. Click Administration > File Management > File Operations.
Note: The available carte du jour options may vary depending on the device model. In this example, SG350X-48MP switch is used.
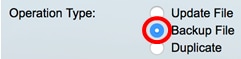
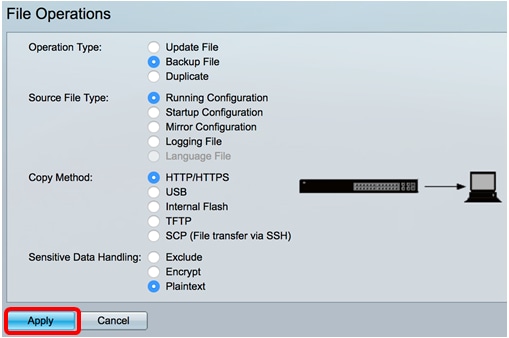
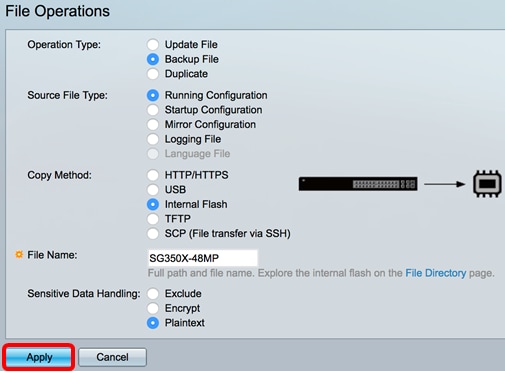
Pace 4. Click the Backup File radio button to back up a configuration file.
Step 5. In the Source File Type expanse, click the radio button of the type of file that you want to be backed up. The switch maintains the following configuration files.
- Running Configuration - The configuration file that contains the electric current configuration, including any changes practical in any management sessions since the last reboot.
- Startup Configuration - The configuration file that is saved to wink memory.
- Mirror Configuration - The running configuration file is automatically saved to the mirror configuration file type if it is not modified for at least 24 hours.
- Logging File - This is where the switch stores all of its logs.
- Language File - This is where the switch stores language data.
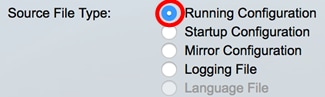
Note: In this instance, Running Configuration is chosen.
Footstep six. Cull i from the following fill-in methods:
- Via HTTP/HTTPS
- Via USB or Internal Wink
- Via TFTP
- Via SCP (Over SSH)
Back Upwards a System Configuration File via HTTP/HTTPS
Step 1. Click the HTTP/HTTPS push to support a configuration file on your local estimator.

Footstep 2. In the Sensitive Data Treatment expanse, choose how sensitive data should be included in the backup file. The options are:
- Exclude - Do not include sensitive information in the backup.
- Encrypt - Include sensitive data in the fill-in in its encrypted grade.
- Plaintext - Include sensitive information in the backup in its plaintext class.
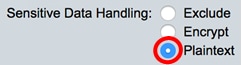
Note: In this example, Plaintext is chosen. This will back up all data in plaintext form.
Stride 3. Click Apply.
Once the functioning is finished, a Success message will be displayed in the File Operations folio.
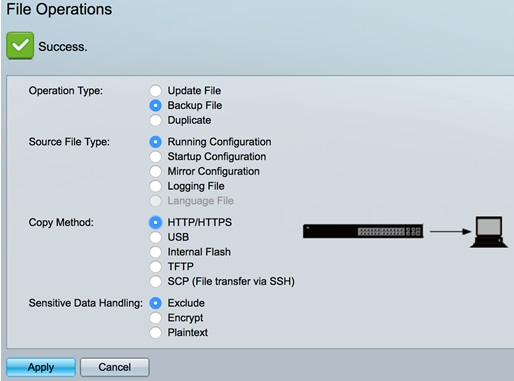
You should at present have successfully backed up the configuration file of your switch through the HTTP/HTTPS transfer method.
[Back to Top]
Support a Organization Configuration File via USB or Internal Flash
Step 1. Cull either USB or Internal Flash every bit the copy method. In this example, Internal Flash is chosen.

Step 2. In the File Name field, enter name of destination file.
Note: In this example, the running configuration file named SG350X-48MP.txt will be saved in the Internal Wink memory of the switch.
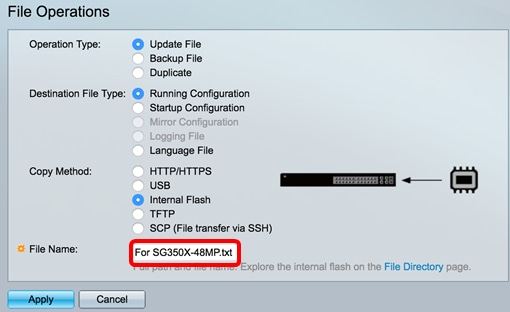
Step 3. In the Sensitive Data Handling expanse, choose how sensitive information should be included in the backup file. The options are:
- Exclude — Do not include sensitive data in the backup.
- Encrypt — Include sensitive data in the fill-in in its encrypted form.
- Plaintext — Include sensitive data in the backup in its plaintext grade.

Notation: In this example, Plaintext is chosen. This volition back up all data in plaintext course.
Step 4. Click Apply to copy the configuration file from the Internal Flash to your switch.
One time the operation is finished, a Success message will exist displayed in the File Operations page.
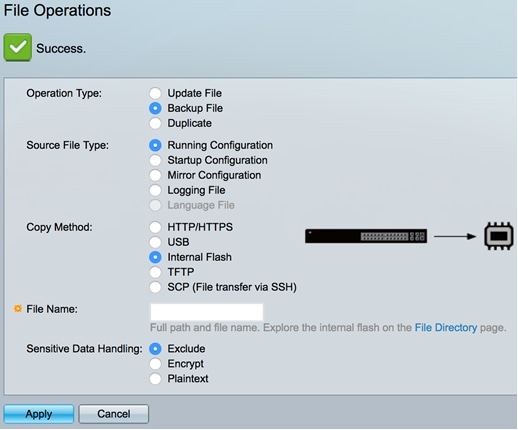
You should at present have successfully backed up the system configuration file on your switch through the Internal Flash or USB re-create method.
Back Upward a System Configuration File via TFTP
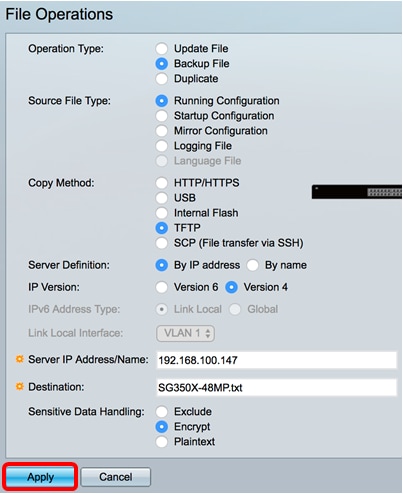
Footstep ane. In the Re-create Method area, click the TFTPradio button. The TFTP method is called to download or support configuration file via TFTP server. This download or dorsum up of configuration files are washed over a secure network.

Pace ii. Click a radio push in the TFTP Server Definition area. The options are:
- By IP address - Choose to enter the IP accost of the TFTP server. In this example, this option is called.
- Past proper noun - Choose to enter the hostname of the TFTP server. If this pick is chosen, skip to Step four.

Footstep 3. (Optional) If yous chose By IP address, cull either Version 4 (IPv4) or Version 6 (IPv6) from the IP Version expanse. If you chose Version half dozen, specify whether the IPv6 is a Link Local or Global address in the IPv6 Accost Type area. If it is a link local address, choose the interface from the Link Local Interface drop-downward list. If Version 4 is called, skip to Step iv.

Note: In this example, IP Version 4 is called.
Step 4. (Optional) If you selected By name in Footstep ii, enter the hostname of the TFTP server in the Server IP Address/Name field. Otherwise, enter the IP address.
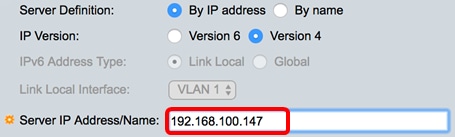
Note: In this example, the configuration file will be saved into the TFTP server with 192.168.100.147 IP address.
Footstep v. Enter the backup file proper noun in the Destination field. In this example, SG350X-48MP.txt is used.

Footstep 6. In the Sensitive Data Handling area, choose how sensitive data should be included in the backup file. The options are:
- Exclude - Do not include sensitive data in the backup.
- Encrypt - Include sensitive data in the backup in its encrypted form.
- Plaintext - Include sensitive data in the backup in its plaintext form.
Annotation: In this example, Encrypt is chosen. This will support all data in encrypted class.
Pace vii. Click Use to start the backup operation.
Once the performance is finished, a Success message will be displayed in the File Operations page.
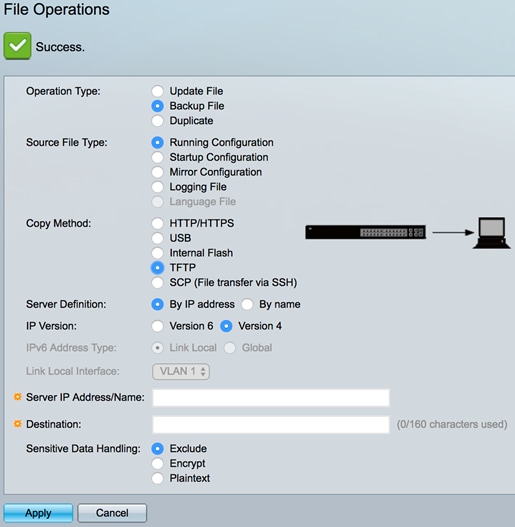
Y'all should now have successfully backed up the configuration file of your switch through the TFTP copy method.
[Back to Elevation]
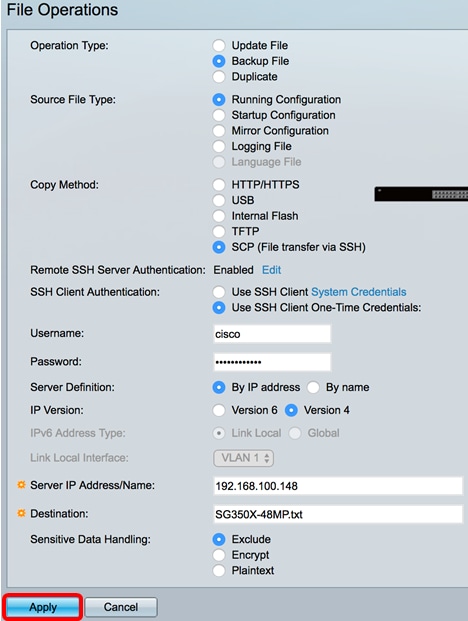
Support a Arrangement Configuration File using SCP (Over SSH)
Of import: Before you lot proceed with the SCP method, make sure that SSH server authentication is enabled and the corresponding settings have been configured. For instructions on how to configure SSH hallmark settings on your switch, click here.
Pace 1. In the Copy Method surface area, click the SCP ( File transfer via SSH) radio button. The SCP method is chosen to download or back up configuration file via Secure Trounce (SSH). This download or back up of configuration files are washed over a secure network.

Stride 2. Brand certain that the Remote SSH Server Authentication is gear up to Enabled. This feature authenticates SSH servers, making certain that the expected SSH server is the correct one. Information technology is disabled by default. Even when disabled, this feature will not affect SSH communications for file operations. If disabled, click Edit to enable the characteristic.

Step 3. Cull a radio button in the SSH Customer Authentication area to specify which SSH credentials to use when contacting the remote host. Choose Use SSH Client System Credentials to employ the permanent SSH credentials stored on the switch (these credentials tin be set for hereafter use by clicking System Credentials, which opens the SSH User Authentication page, or choose Apply SSH Client One-Fourth dimension Credentials to apply temporary credentials.
Note: The username and password for 1-time credential will not be saved in configuration file.
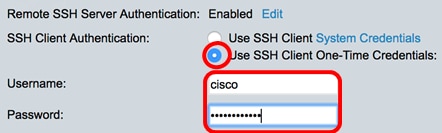
Note: In this example, Use SSH Client One-Time Credentials is chosen and the username and password details are entered accordingly.
Footstep four. Click a radio push button in the SCP Server Definition area. The options are:
- By IP accost - Cull to enter the IP address of the SCP server. In this case, this option is called.
- By proper noun - Cull to enter the hostname of the SCP server. If this option is chosen, skip to Pace 6.
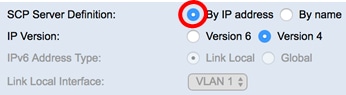
Step v. (Optional) If you lot chose By IP address, choose either Version 4 (IPv4) or Version 6 (IPv6) from the IP Version area. If you lot chose Version six, specify whether the IPv6 is a Link Local or Global address in the IPv6 Address Blazon area. If information technology is a link local address, choose the interface from the Link Local Interface drop-downwardly listing. If Version iv is called, skip to Step 6.
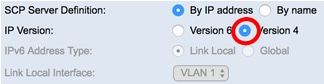
Annotation: In this case, IP Version 4 is called.
Step 6. (Optional) If you selected By proper name in Footstep 4, enter the hostname of the TFTP server in the Server IP Address/Name field. Otherwise, enter the IP address.
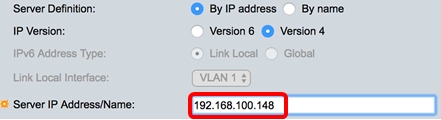
Note: In this case, the configuration file will be saved into the SCP server with 192.168.100.148 IP address.
Step seven. Enter the backup file name in the Destination field. In this example, the backup configuration file volition be saved in the SG350X-48MP.txt file.

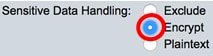
Step 8. In the Sensitive Data Handling area, choose how sensitive information should be included in the backup file. The options are:
- Exclude - Do not include sensitive data in the fill-in.
- Encrypt - Include sensitive data in the fill-in in its encrypted form.
- Plaintext - Include sensitive information in the backup in its plaintext form.
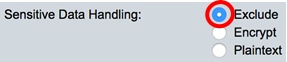
Annotation: In this example, Exclude is chosen. The backup file will non include sensitive data.
Step nine. Click Employ to start the backup operation.
Once the operation is finished, a Success message volition be displayed in the File Operations folio.
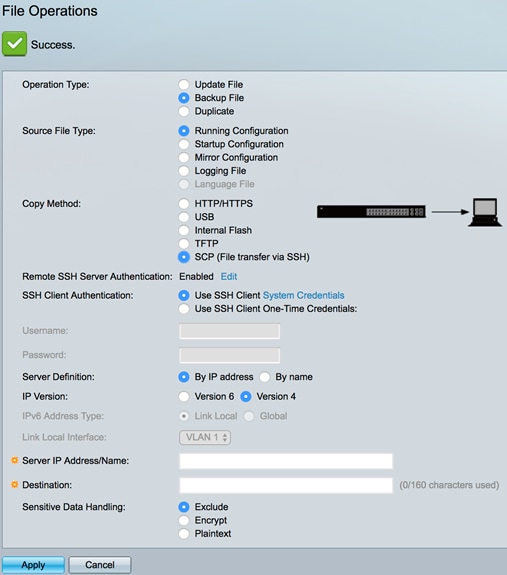
Yous should now have successfully backed up the configuration file of your switch through the SCP copy method.
[Back to Top]
To know how to update a configuration file on a switch, click here. To indistinguishable a configuration file, click here for instructions.
Source: https://www.cisco.com/c/en/us/support/docs/smb/switches/cisco-250-series-smart-switches/smb5754-download-or-back-up-configuration-files-on-a-switch.html
Post a Comment for "How to Upload a Config File to a Cisco Switch"